BIG GUY IN A BOW TIE
  • Home
  • Membership
  • Bow Tie Blog
  • Resources
    • Free Resources
    • Active Presentations
    • Active Workshops
    • Retired Presentations
  • Media
    • YouTube
    • Websites
  • Tynker
    • Why Tynker?
    • Get Tynker Certified
  • Work with Me
    • About the Big Guy
    • Experience
    • Work With David

What's In My  Ed Tech Bag?

12/23/2014

1 Comment

 
Picture
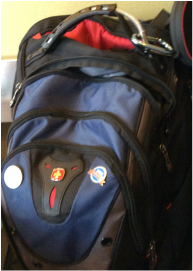
     I have many friends in ed tech who make fun of this bag. They give me a hard time. They think it's the Mary Poppins Bag of Ed Tech. You know What? I don't mind it. In reality, I love the fact that I can pull almost whatever I need for almost every occasion out of it. Is some of it a bit to much? Probably, but I own my nerdiness, and it shows in this post. I thought a good way to close out this year would be to show you what's really in my tech bag.
     So to start, let me describe my bag. It's a Swiss Gear IBEX Notebook, which through an online search retails for about $75-$80. I really like the Swiss Gear Bags as this is my second one. They hold up pretty well, have lots of pockets, are comfortable to wear, and they look decent. My has a total of four main pockets, one smaller protected pocket, two side small pockets, and the mesh pockets typically used for water bottles. All in all it's a great bag for the space and for the price
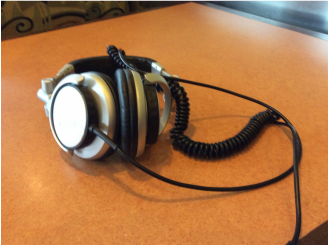
Picture
Picture

The Outside Pockets

So lets start with my outside pockets, and the cast that is attached with a carabiner. They are all small, so I lump them in together.
  • My Big Headphones (Located in Case Attached with Carabiner)-  I actually came by the headphones through a bit of luck as I got them for free. They are Sony-MDR-V700's, and they retail for about $138. They are noise canceling headphones with a good clear sound. They are also cheaper retail wise than a pair of Beats, and in my opinon a little better made. 
  • Earbuds (Located in one of the Side Zipper Pockets)- I love having options, so I keep a couple of different earbud sets in my bag. One is a skull candy set, and two are Apple Ear Pods. The Apple EarPods come in handy when doing Google Hangouts.
  • Writing Pens (Located in other Side Zipper Pocket) - You never know when you need a pen, so I keep a couple in my bag for those occasions. All my pens where actually freebies from ed tech companies like Touchcast, Edmodo, Nearpod, and Remind, and some of them can even double as a stylus
  • Cleaning Gear (located in one of the mesh pockets usually for water bottles)- I do have several rags to clean screens, and I even have a tool to clean keyboards

Picture

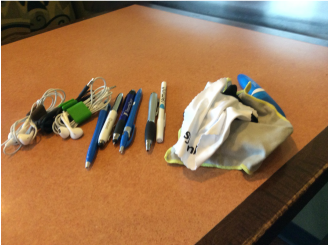
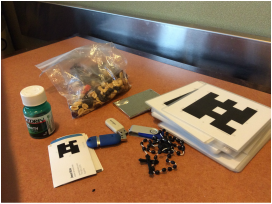
The Front Pocket

     This pocket is not a big one, but it has lots of places to store smaller items. So heres a list of what you see in the picture
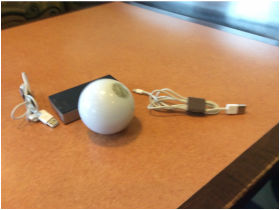
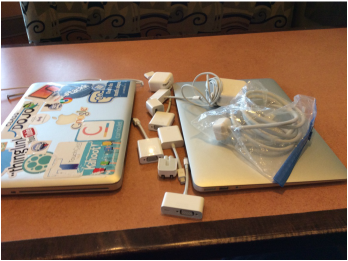
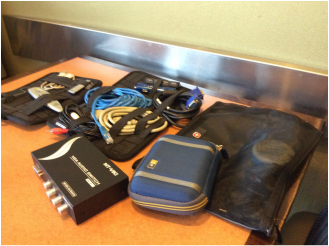
  • Advil or Something to that effect- I do have headaches thanks to my contacts and neck issues, so I make sure that I have something to take care of them when needed
  • Tech Company Business Cards- You never know when you want to get an answer or some help with an event, so I try to keep my favorite tech companies contact info 
  • Flash Drives- It's amazing to me that these have gone out of style, but I do keep a couple just in case
  • Catholic Rosary- I always carry one with me, to remind me what's most important
  • Plickers Cards- Plickers is a great way for teachers to get quick assessments. I use these cards with teacher's as I am coaching in the classroom. Visit plickers.com for more information on the app
  • My own Business Cards- I finally got some business cards, and I have a nice holder to keep them fresh for when people ask me for them at conferences
  • Trail Mix- This is my snack of choice and I always keep some on hand to fight hunger
Picture

The Next Pocket Back

The next pocket back, is the real take care of anything pocket. This pocket holds a ton of stuff. I keep it organized by using two grids its, a pouch, and the pocket that is built in. So here's the list!
  • Presentation Remote- I have tried to use Ipad to run conference presentations, and it always seems to get stuck. I now keep a presentation remote handy just in case
  • Leap Motion- Leap motion is a very cool brick that you can use to add gesture control to your computer. I have not figured out the best way to use it yet, but I will.
  • 2 VGA Cables- I do presentations where I want to connect multiple devices to the projector. In order to do so you have to have some extra VGA cables.
  • 2 USB Extenders- These are the devices where you can pug them into 1 USB port and then plug in multiple USB devices. Both of these have 4 ports, and you never know when you will use them
  • 1 Ethernet Cable- We all know Wifi can be spotty at times, so it's always good to have an Ethernet cable.
  • 1 Audio Cable- You never know when you will need to plug in sound.
  • VGA Switcher- This box is an awesome tool for presentations as it will let me switch back and forth from my computer to my Ipad with ease to demo apps
  • External Hard Drive- This is my main file back up. Just something to have as an in case!
  • Sphero Charger and the future home of the Myo charger- The pouch is where I keep my Sphero Charger, and when I get my Myo its charger will go there to. Because of the nature of the Sphero charger it does not work well with the Cocoon Grid it's


Picture


The Next Pocket

I don't keep much in the next pocket back because it really does not have much in the form of organizational places in the pockets. It does serve an important function though as it's where I keep my tablets. I do keep them in a case that I got from ISTe in 2011. So here's what I got
  • Ipad 2- I have considered dropping this one from my bag, but I keep finding reasons to keep it. The newest being using it as a second display with Duet Display
  • Ipad Mini- I am not sure what generation it is, but I got this Ipad Mini from my current job. I love it. I love the size of it, and that it's a 64GB when I have previously only had 16 GB Ipads.
  • Power Strip- This always comes in handy because I never know when I will be at a conference or meeting where I will need it
Picture

The Protected Pocket

Between the third pocket and the main pocket there is a smaller protected pocket. It's protected through the extra padding in it, and I think the original intent is for it to be a pocket for something like an Ipod because you can weave headphones in to it. I use this pocket as a charge / special gadget pocket. So here is what is in it, and what's coming :)
  • Mophie Battery Pack- I love, love , love, having an extra battery pack. This allows me to have juice all day. It's Great for conferences.
  • Apple Cables- I have both the 30 pin cord and the lightning cord, as I have devices for both. I keep them in this pocket to give me easy access to the extra batteries
  • Sphero- The little white org you see is Sphero. It's a robotic ball that is great for Maker Space and Stem projects. It's a great little gadget to have in the arsenal
  • Myo- When this arrives, it will go in this pocket. It's a gesture control armband, and I can't wait for it!
  • Limecell Battery Pack- I found a great deal for this $80 battery recently, and I know it's coming as a so-called Christmas present
Picture

The Main Pocket

The main pocket is where I keep the really good stuff. It's where the computers are! One is my personal, and one is my work computer. I would assume it's easy to tell which is which. So here's the list
  • 13 inch Macbook Pro and Charger- This is my personal computer, and its obviously the one with ed tech stickers. This is my workhorse and presentation computer
  • 13 inch Macbook Air and Charger- This is my work computer. I have grown to love it for it's weight, great battery life, and quick wake. It's a great computer for conferences and Tweet Deck
  • 5 VGA Adapters- I have VGA adapters for everything. I have two lightning, two for Mac, and one 30 pin. These tend to wear out, so I always like having extras!
  • Ipad and iPhone Power Bricks- I like having these with me just in case I have to plug in!
1 Comment

A Teachers Step By Step Approach to Personalized Learning.

12/15/2014

1 Comment

 
Picture
     What is Personalized Learning? How do we get there? I am working for a school district that is pushing Personalized Learning as their big initiative. I love that idea. I love the idea of making schools special places for every student. With personalized learning, students work on the areas that they are personally weak in, and in many cases they use areas they are strong at to improve on those weak spots.
      What does this mean for the teacher though? It has to mean a change in mindset. You can't be the sage on the stage anymore. You have to let students own their learning and take control of it. The age of having every student face the board or projector every day and take notes is dead. It's just not engaging, and deep down most teachers know it. It's especially not engaging for today's student.
     Change is hard though. I think what get's lost in this transition to personalized learning is a path for teachers to take. Many districts and education theorist push the approach, but it's hard to get a teacher to make that change if they don't know where to start. Below you will find steps that I would take if I was still in the classroom. (I added Links to suggestions for you to start exploring) These steps can be different for everyone, but it gives you a place to start. Really, you can personalize the process to you!
  • Step 1: Have a Web Presence- To really personalize learning, you need a way to present and organize student options. You need a way to have a classroom without walls. You can do this through some type of web presence. This web presence could be one of the hundreds of Learning Management Systems out there (Like Edmodo or Schoology), it could be a district provided system like (Edgenuity or Blackboard), or it could be one you build yourself ( through Google Sites, Wix, or Weebly). If you don't have one you need to start! In the end, it''s also great marketing to parents and the community. Personally, I like to build my own web presence in order to break free of the constraints of an LMS. I used a combination of Weebly and Symabloo in order to do it. You can see my web presence at lockhartushistory.com.
  • Step 2: Change the Way You Use Your Web Presence- A web presence is great, but what are you going to do with it? Personalized learning is all about changing the student outcomes, so why not change the student outcomes from your web presence. Most teachers use their web presence as a way to help students who are absent, or a way to help students who forget assignments. Teachers use it as reminder and homework system. To get the most out of it though, just like anything you have to change your mindset. Why not use this as a way to add all sorts of options. Students could then use it in class! You could have different ways to expose students to base content. You could have different choices for assignments that would prevent you from printing off loads and loads of assignment sheets. Symbaloo is a great way to present assignments. It allows you to embed Google Drive which opens up a world of possibilities for choice and organization. You could then embed these on your own website or you could add a link if using something like an LMS. You can see my example of a Symbaloo webmix at this link
  • Step 3: Go Paperless (But Not Completely)- If you change the way you use your web presence, you can then go paperless. Students can access all of their assignments from the website, but most importantly you can start having students also turn in their assignments digitally. An easy way to do this is, is to establish an email for it. Make a gmail address that is only for turning assignments. Then you can easily grade by just going through the inbox. You could even build Rubrics through Google forms that you can fill out and send back to students. Other ways to have assignments turned in digitally include using Dropbox, a New app called Skaffl, or a wall like Padlet. If you are an LMS (such as Edmodo) user, there is always an option to use that as a turn in service. With all that being said, should you go completely paperless? My answer is no. Leave paper as an option. Some students prefer it. There is nothing wrong with a few students turning in paper assignments from time to time. You could also leave that option open as a way to deliver assignments and content to students who really want it that way. 
  • Step 4: Assess Digitally- In today's world, you should laugh at the teachers who are standing at the scantron machine at the end of the semester. (if a school has enough devices, it's very understandable if lack of devices are an issue) There are so many great ways to assess digitally in today's world that using the paper version is just inefficient. All of the digital assessments provide great data that allows you to take that next step to personalizing instruction. What's also great is you get the results right away! You could start small by using the quiz function in whatever LMS you use. Edmodo's works pretty well. You could then progress to using something like Kahoot! which gamify's it, Socrative which is great for formal assessments, Infuse Learning which allows you to do easy one question assessments, or Plickers which you can do with 1 Device!
  • Step 5: Create, Create, Create- A HUGE part of personalized transformational learning is allowing students to create. In reality this is easier with technology, but it definitely can be accomplished with no technology. There are hundreds of ways to let students create, but when you do it digitally it generally can fall in a few categories: presentations, video, audio, animation, and web design. If you are going to start moving this way, START SMALL. It could be as little as having students draw a historical figure and detail the message their 5 senses are getting. This takes NO TECHNOLOGY. You could also do things like have students do hand drawn videos. They can draw out every scene of their video and they can either present it in class or you can use one device to film it. There are other ways to do it with minimal technology, you just have to get creative. When you finally do get technology, the Apple apps are a great place to start for presentations, movies, and audio. There are loads of animation apps out there, it just depends on what you want. Weebly's education version allows you to have 40 free student accounts for students to easily build websites.
  • Step 6: Give Choice for Creation- To truly make learning personal, you have to give students choice. They have to be able to choose what projects they do, and truly take ownership of it. Start small with this step. There are also different ways to approach it. You could start as small as giving them a choice between two creation projects. You could make it more. It just depends on what you can handle. You could also give students choice in how they present their creations. Really, this all about ownership,and anything you can do to improve that aspect for students will make the learning outcomes better.
  • Step 7: Give LOTS of Choices- I separated this out because I truly believe this is a next step. The next step is to give choices on things other than students creation projects. It could be choices on how they receive content. It could be choices on how students are assessed. Really, its up to your imagination and creativity. When I was in the classroom, I gave students the option of the traditional lecture approach, or they could use the online flipped approach. Really, it again comes down to students taking ownership.
  • Step 8: Start Using Data to Make Real Decisions- It's a given that teachers are supposed to use data to make decisions, but how many actually do it effectively? Personalized learning requires you to do that. Take the data from your digital assessments and make real decisions on what students know and what students don't know. Give pretest to give the students who know a pass on stuff they already know and really focus in on the areas you have to teach. Then assess how well things are going through out. In the end, this seems hard, but in the end it allows us to do what we all really want. We can take knowledgable students deeper and hit those areas of our content that we think should be in the standards. We can also start to mold students choices to their interest. If a student is doing poorly, we can go to them, and start looking for interest we can use. For instance, if a student loves comic books, but struggles in our class we can have them create comic books as a student outcome.
  • Step 9: Differentiate those Choices- The great thing about digital creation is it makes it easy to differentiate. As you have students create, you can have students who struggle do creation projects that are simple such as Imovie trailers and simple radio broadcasts. As students progress, they can do more complex Social Media, web, and Video projects. They could then do something like a full on news broadcast with segments as a top project. This is really all about your creativity. A great way to present those choices is by using Symbaloo webmixes
  • Step 10: Move Away from the Sage on the Stage- This can be the hardest change for not only teachers, but also the students. This requires students to take total ownership of their learning, and it requires the teacher to become more of a facilitator. You can make this change slowly. Start with Nearpod. Nearpod is basically Power Point on steroids. It allows you to sync your presentations with students devices and deliver interactive content to them. It's a first step in moving the class away from the teacher and the front of the room. Once you have that, add in flipped videos. Flipped Videos are videos of your "lectures" or base content that students can explore on their own. Touchcast is a great way to do those. You could start by doing them as a supplement to your in-class instruction and for those who are absent. You could then move them to being an option to take instead of the in-class lectures. Basically, as you have in-class lectures for those who still want it, students who learn better on their own could take that time to explore the content. Personally, I have found that their are many students who are so trained in the traditional approach, that at this point you still have to have it in your class. You can shift it though to being an option, and then the key is to make it the most fun engaging traditional approach that you can. Hopefully, as personalized learning spreads to every level, non-traditional approaches will become the norm!
  • Step 11: Take the Differentiation Further! Personalize It- The last step is to really personalize that learning. You need to get to know your students, and then you need to give them choices that align with their interest. If a student loves comic books, that could be the way they show their learning. If they are great at Math, how can that be used to show their understanding of History? It's all about finding ways to let students use their strengths in order to improve their weakness. 


1 Comment

Death to Power Point!!! It's time to Kill It

12/6/2014

1 Comment

 
Picture
1 Comment

    Archives

    January 2023
    November 2022
    October 2022
    September 2022
    August 2022
    July 2022
    June 2022
    May 2022
    April 2022
    March 2022
    February 2022
    January 2022
    December 2021
    November 2021
    October 2021
    September 2021
    August 2021
    July 2021
    September 2020
    August 2020
    July 2020
    June 2020
    May 2020
    November 2019
    October 2019
    September 2019
    August 2019
    June 2019
    May 2019
    April 2019
    March 2019
    February 2019
    January 2019
    December 2018
    November 2018
    October 2018
    September 2018
    July 2018
    June 2018
    May 2018
    April 2018
    March 2018
    February 2018
    December 2017
    November 2017
    August 2017
    March 2017
    February 2017
    January 2017
    December 2016
    November 2016
    October 2016
    September 2016
    August 2016
    July 2016
    May 2016
    March 2016
    February 2016
    December 2015
    November 2015
    October 2015
    September 2015
    August 2015
    July 2015
    June 2015
    May 2015
    April 2015
    March 2015
    February 2015
    January 2015
    December 2014
    November 2014
    September 2014
    August 2014
    July 2014
    June 2014
    May 2014
    April 2014
    November 2013
    October 2013
    August 2013
    July 2013
    June 2013
    May 2013

    Categories

    All
    #edchat
    #edreform
    #edtech
    #education
    #iste

    RSS Feed

Powered by Create your own unique website with customizable templates.
  • Home
  • Membership
  • Bow Tie Blog
  • Resources
    • Free Resources
    • Active Presentations
    • Active Workshops
    • Retired Presentations
  • Media
    • YouTube
    • Websites
  • Tynker
    • Why Tynker?
    • Get Tynker Certified
  • Work with Me
    • About the Big Guy
    • Experience
    • Work With David